
Mekkit University 044 Sloped Path Illusion
Hey everyone!
DOGS was kind enough to write up a little tutorial on the sloped paths he made for his park in the Water Park contest! It's full of screenshots and should be easy to follow!
DOGS’ Advanced Path Techniques: Sloped Path Illusion
Method by DOGS

Creating stylish pathways on slopes has always been a unique challenge with a variety of solutions, typically incorporating scenery or track pieces to simulate path. Here, I will demonstrate a step-by-step process to create sloped pathways using only path pieces and the tile inspector tool in openRCT2. This trick relies on an optical illusion made possible by the game’s isometric perspective. In the final product, sloped path pieces that appear to be on ground-level will in fact be deep underground. Because of this illusion, the trick will need to be done up to four times for every intended viewing angle in order to create a seamless effect. I will be demonstrating this process with a 2x3 sloped area, but the technique is easily applied to a variety of shapes and sizes once you get a grip on the logic of how it works.
Phase 1: Defining the work area and preparing path pieces
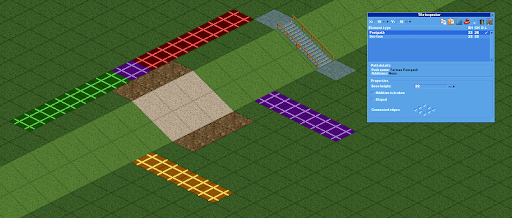
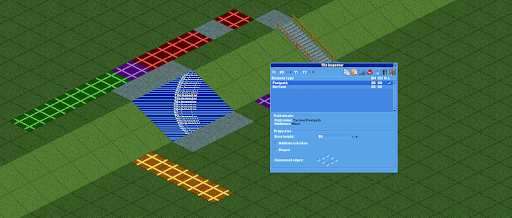
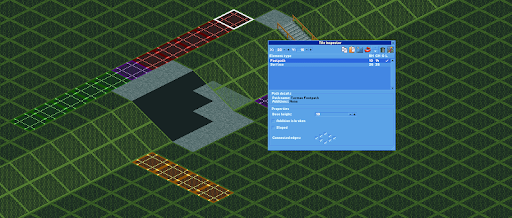
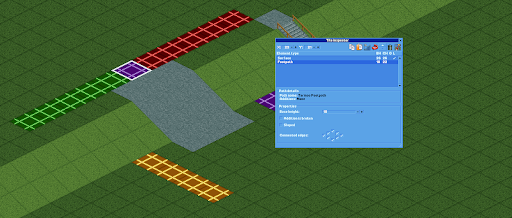
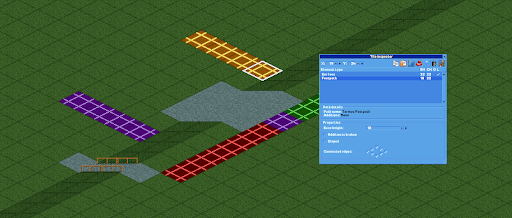
1.1) First, we will need to use the terrain tool to color the locations our sloped path elements will occupy. The screenshot below will initially appear complicated, but it is useful for visualizing where our underground path pieces will end up. The dirt tiles will have normal ground-level path elements, and the sand tiles will be where our sloped path element will APPEAR to be once the illusion is complete. We will worry about the colorful tiles when they become useful.
1.2) We will also create a few path elements to easily copy-paste later. The flat path elements need to be connected on all sides in the Tile Inspector tool so that they completely fill the tiles they occupy without any gaps.
Phase 2: Adding peep-functional path and preparing slope for illusion
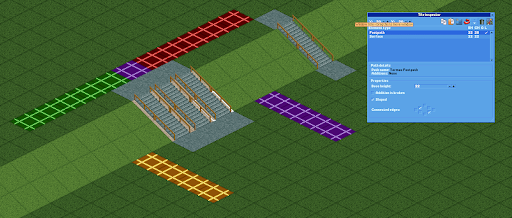
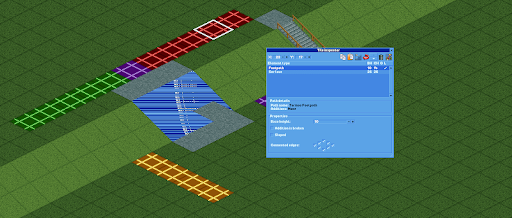
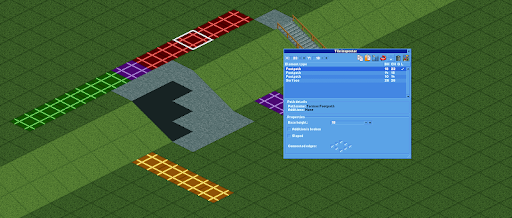
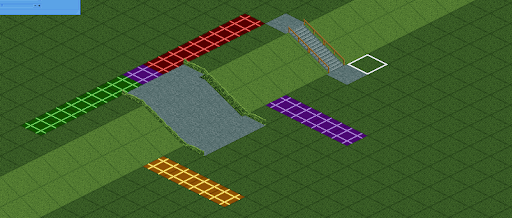
2.1) Using the copy-paste functions in the Tile Inspector tool, we will use the path pieces we initially created on the side to make normal peep-accessible path on the top edge, bottom edge, and slope. These are the path pieces that peeps will actually walk on and calculate pathfinding with.
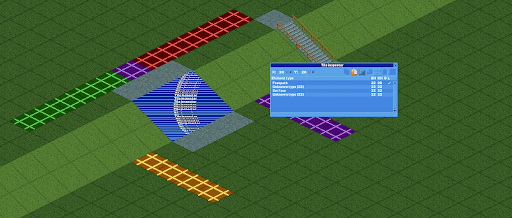
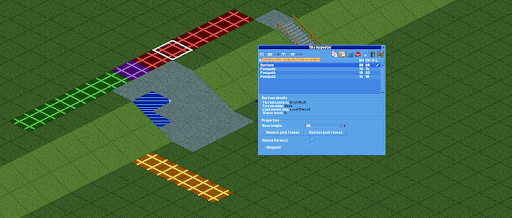
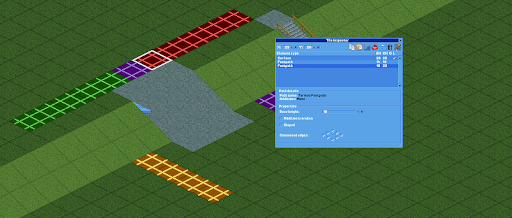
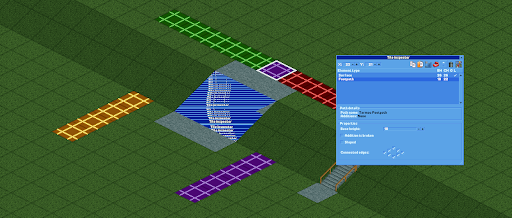
2.2) Now we will make all of the elements on the sloped sand tiles invisible using the Corrupt Element feature in the Tile Inspector. We will want to hide both the sloped path elements as well as the surface element itself by clicking the elements in the Tile Inspector and clicking the Insert Corrupt Element button on the top-right of the window. Turning the surface invisible will create some unique rendering effects because the game isn’t writing anything to that pixel location. Typically, it will appear as a confusing smear of pixels from whatever used to be rendered at that location. In order to make my screenshots more readable I will be smearing the Tile Inspector window over the work area to make invisible surface tiles an easily-discernible blue color.
Phase 3: Adding underground path elements to simulate an “uphill” sloped path.
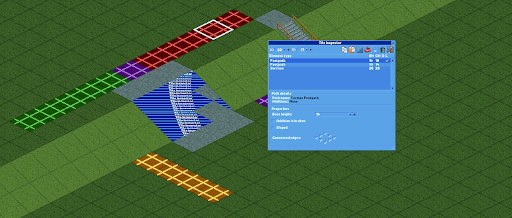
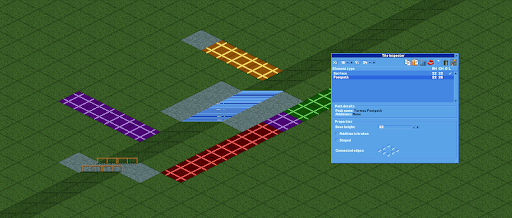
Here is where the colored ground tiles will become useful. The red tiles will be used for the angle of the current screenshots, and the others will be for the remaining three camera perspectives. The single purple tile on the top will be shared by both the red and green perspectives.
3.1) Paste a flat path element from the upper elevation into the red tile indicated by the screenshot. While I could technically begin the process from any of the red tiles, I will start on the second from the right because it is the easiest to visualize.
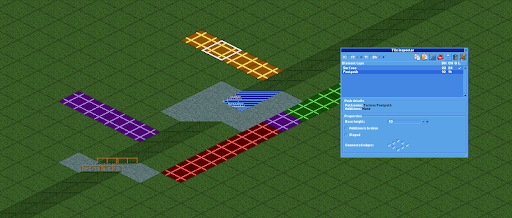
3.2) Now, using the Base Height function in the Tile Inspector, lower the path we pasted underground until it lines up with the bottom edge of the slope. You may need to wiggle the camera or move the Tile Inspector window over your work area to see what is happening, because of the rendering quirk I mentioned earlier.
Copy-paste another path element onto that same red tile and lower it into the ground until the corners of both path pieces touch each other as shown below. We will be using this process for each of the remaining red tiles until the entire sloped area looks like it is filled with path.
3.3) Now we can paste a path element onto the rightmost red tile since it is easier to visualize what is happening. Once pasted, use the Base Height function to drop the path piece underground until it fills the gap between the rightmost edge and the path pieces we added earlier.
You might find the subterranean view useful, but note that path elements that appear to be joined from this perspective are in fact not, and just appear to be due to the isometric perspective employed by the game.
3.4) Hopefully you are beginning to see how to repeat this process. We will now use the copy-paste and Base Height functions to place path pieces on the remaining red tiles and line them up with the slope illusion.
The tiny gap still visible in the above screenshot is filled by using the same exact process on the purple tile. Luckily for us, this purple tile will actually serve the same function for two camera perspectives – both the “red” and “green” angles.
Phase 4: Rotate camera and repeat Phase 3 process for “green” perspective
The screenshot below shows what you will see from the “green” perspective after completing the original “red” perspective. The tiny piece on the purple tile is already filled, which means we don’t need to worry about that purple tile anymore.
Here you can repeat the exact same process from Phase 3 using the green tiles instead of red. Paste path elements onto the green tiles and bury them underground with the Tile Inspector until the sloped area is filled with path.
Phase 5: Process for the “downhill” perspective.
5.1) Rotate the camera so that your perspective is looking downhill down the slope. Paste a path element onto the furthest yellow tile and bury it until it visually lines up with the flat path on the lower elevation after the slope.

Note again that these path pieces only appear to line up and are not actually connected.
5.2) We will continue this process, pasting path pieces onto yellow tiles and burying them until they line up inside the sloped area. Use the white highlighted tile in each screenshot to reference their locations.

5.3) To finish the illusion, rotate the camera and repeat the previous Phase 5 process using the purple tiles.
If all goes well, you should have a complete 2x3 sloped area that appears to be filled with path! Because the sloped tiles have hidden paths, and because the simulated path elements we copy-pasted onto the colored tiles are in no way connected to the functioning path, you should have a completely functional slope for peeps to walk all over without negatively influencing the pathfinding algorithm.
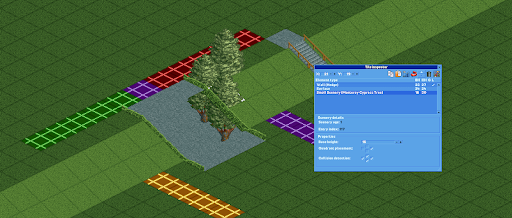
Phase 6: Caveats for decoration
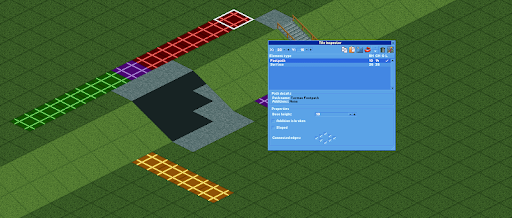
Because we are employing a radical optical illusion to create a sloped path, we need to be extra careful about how we decorate the surrounding area. Any element adjacent to the path that has portions buried underground will interrupt the illusion. A couple screenshots below demonstrate how buried items can break the illusion.
As long as you are strategic in how you employ this technique, it is possible to create some stunning results! Planning ahead is extremely important, and I suggest practicing on an empty map until you are confident in your ability to visualize where the subterranean path needs to be placed. You will also find this technique useful when applied to non-sloped paths, such as when you want to create a diagonal path where it’s not possible to use palette tricks, such as diagonal crazy path. I am a firm believer that hands-on experience is the best teacher, so go out there and get messy! Good luck, and make sure to share your results with everyone on the DKMP discord server!
-DOGS